经过好多天的努力,博客基本上也达到了自己满意的样子。博客以Bootstrap-Blog为蓝本,在此基础上增增减减,修修改改。因为自己并不是很懂网页,大多时候都是摸索和调试,所以费时还是挺多的。现在终于能踏踏实实的写文章了。
之前我也用过很多博客,但是自己却很少认认真真的写过文章。原因之一就是自己文笔不好,思考半天都写不出来一句话。从小学到大学,作文一直就是我的痛点,时间费得最多,效果还不是很好,这也是我可提高之处吧!现在,我想我得尽量多写吧,至少搭建这个博客我还是挺费心的。其实很多时候不必思考过多,随心所欲,应该也是很不错的。
写这篇文章的目的是对我的Hexo之旅做一个小结,也算对这次博客搭建告一段落。
所参考的一些链接
当然,最主要的还是Hexo官网上的资源,包括教程、主题等等。
详细教程
如何搭建一个独立博客——简明Github Pages与Hexo教程
这篇文章十分详细,作者在后面给了很多其他教程的链接。
图灵社区:Hexo合集
这篇文章对于Hexo的使用更加详细,适合想要深度折腾的同学。
增增减减
Hexo,添加返回顶部按钮,如果打不开,请点击这里
一些问题
npm国内被墙的解决方法,应该前两步就能解决。
连接挂掉, 补(http://blog.csdn.net/qq_23329541/article/details/68927747)
1
2
|
npm config set strict-ssl false
npm config set registry "http://registry.npmjs.org/"
|
被墙的另一个解决方法。
使用taobao npm镜像
npm install -g cnpm --registry=https://registry.npm.taobao.org
搭建 hexo,在执行 hexo deploy 后,出现 error deployer not found:github 的错误
OK, 剩下的就是好好的写文章吧!
160622更新
设置sublime_text为默认编辑器
1
|
git config --global core.editor "'D:/Program Files (x86)/Sublime Text/sublime_text.exe' -w"
|
设置Notepad++为默认编辑器
1
|
git config --global core.editor "'D:/Program Files (x86)/Notepad++/notepad++.exe' -multiInst -nosession"
|
直接使用命令subl编辑文本
把sublime_text.exe的所在目录添加至环境变量的path中
在Git下直接使用命令
就可以直接使用sublime text编辑文本文件了
参考链接: https://git-scm.com/book/en/v2/Getting-Started-First-Time-Git-Setup
161104更新
使用上述教程部署网站出现错误
 1
 2
 3
 4
 5
 6
 7
 8
 9
10
11
|
$ hexo d
	...
nothing to commit, working tree clean
bash: /dev/tty: No such device or address
error: failed to execute prompt script (exit code 1)
fatal: could not read Username for 'https://github.com': Invalid argument
FATAL Something's wrong. Maybe you can find the solution here: http://hexo.io/docs/troubleshooting.html
Error: bash: /dev/tty: No such device or address
error: failed to execute prompt script (exit code 1)
fatal: could not read Username for 'https://github.com': Invalid argument
	...
|
解决方法:
1
2
3
4
5
|
修改根目录文件:_config.yml
原有内容:
	repository: https://github.com/username/username.github.io.git
修改为:
	repository: git@github.com:username/username.github.io.git
|
参考链接:http://www.jianshu.com/p/d1fc64c445ce
update for detail steps
 1
 2
 3
 4
 5
 6
 7
 8
 9
10
11
12
13
14
15
16
17
18
19
20
21
22
23
24
25
26
27
28
29
30
|
download git
download node.js

// gen ssh-key
ssh-keygen -t rsa -C "wangkest@qq.com" #  -C comment 你的ssh名称(本地)

// add ssh-key to github
// https://github.com/settings/keys
(http://blog.csdn.net/keyboardota/article/details/7603630)

// verify
ssh -T git@github.com

// config
git config --global user.name "username"
git config --global user.email "username@gmail.com"

npm install -g cnpm --registry=https://registry.npm.taobao.org

cnpm install -g hexo
cnpm install hexo-deployer-git --save

// or use taobao mirror
// npm config set strict-ssl false
// npm config set registry "http://registry.npmjs.org/"
// npm install -g hexo
// npm install hexo-deployer-git --save

cd your_hexo_dir
hexo init
|
2017-9-6 update
add quick generate_deploy.bat
1
2
3
4
5
6
|
@echo off & rem not print commond
title Hexo & rem setting title
rem cd D:/github/hexo
"D:\Program Files\Git\bin\sh.exe" --login -i -c "cd /d/github/hexo && hexo generate --deploy"
pause
exit
|
ref:
update
代码块空行问题
change hexo util file highlight.js
file path: your_hexo_dir/node_modules/hexo-util/lib/highlight.js
update code
1
2
3
4
5
6
7
8
|
  for (var i = 0, len = lines.length; i < len; i++) {
    line = lines[i];
    if (tab) line = replaceTabs(line, tab);
    numbers += '<span class="line">' + (firstLine + i) + '</span>';
    content += '<span class="line';
    content += (mark.indexOf(firstLine + i) !== -1) ? ' marked' : '';
    content += '">' + line + '</span>';
  }
|
to code
 1
 2
 3
 4
 5
 6
 7
 8
 9
10
11
|
  for (var i = 0, len = lines.length; i < len; i++) {
    line = lines[i];
    if (tab) line = replaceTabs(line, tab);
    // numbers += '<span class="line">' + (firstLine + i) + '</span>';
    // content += '<span class="line';
    // content += (mark.indexOf(firstLine + i) !== -1) ? ' marked' : '';
    // content += '">' + line + '</span>';

    numbers += '<span class="line">' + (i + firstLine) + '</span>\n';
    content += '<span class="line">' + line + '</span>\n';
  }
|
ref:
http://blog.csdn.net/tobacco5648/article/details/42584653
http://xingwu.me/2014/11/08/Hexo-Code-Block-Bugs-Comments-Style-and-Empty-Lines/
permalink config
https://clearsky.me/hexo-permalinks.html
http://www.wuliaole.com/post/permalink_and_internal_link_in_hexo/
2018-10-13 update
添加公式
hexo-math已经被抛弃了, 所以使用hexo-math并无任何效果, 使用hexo-renderer-mathjax进行替代
如果你已经安装了hexo-math, 需要先卸载
$ npm uninstall hexo-math --save
然后, 安装hexo-renderer-mathjax
$ npm install hexo-renderer-mathjax --save
在主题的配置文件_config.yml中添加下面属性, 配置mathjax
1
2
3
4
5
|
# MathJax Support
mathjax:
  enable: true
  per_page: true
  cdn: //cdn.bootcss.com/mathjax/2.7.1/latest.js?config=TeX-AMS-MML_HTMLorMML
|
OK, 下面是一些测试
1
2
3
4
5
|
行內公式 $\sin ^{ 2 }{ \theta +\cos ^{ 2 }{ \theta =1 }  }$ 行內公式

行外公式

$$\frac { dy }{ dx } =\frac { { e }^{ x } }{ 3{ y }^{ 2 } }$$
|
行內公式 $\sin ^{ 2 }{ \theta +\cos ^{ 2 }{ \theta =1 } }$ 行內公式
行外公式
$$\frac { dy }{ dx } =\frac { { e }^{ x } }{ 3{ y }^{ 2 } }$$
参考链接: https://nathaniel.blog/tutorials/make-hexo-support-math-again/
另外, 推荐一个主题next
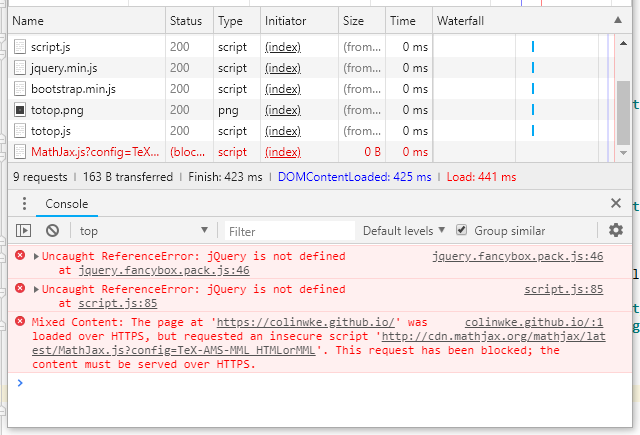
mathjax Mixed Content导致不能渲染公式
或者(chrome出现一个拦截图标, 不安全连接)

前面的两个错误Uncaught Reference Error
加载js的顺序不对, 需要先加载jquery, 然后再加载后两个js
第三个问题, 也就是渲染公式
修改[hexo_root]\node_modules\hexo-renderer-mathjax\mathjax.html:
把最后一行
 1
 2
 3
 4
 5
 6
 7
 8
 9
10
11
12
13
14
15
|
<script type="text/x-mathjax-config">
    MathJax.Hub.Config({
        tex2jax: {
            inlineMath: [ ["$","$"], ["\\(","\\)"] ],
            skipTags: ['script', 'noscript', 'style', 'textarea', 'pre', 'code'],
            processEscapes: true
        }
    });
    MathJax.Hub.Queue(function() {
        var all = MathJax.Hub.getAllJax();
        for (var i = 0; i < all.length; ++i)
            all[i].SourceElement().parentNode.className += ' has-jax';
    });
</script>
<script src="http://cdn.mathjax.org/mathjax/latest/MathJax.js?config=TeX-AMS-MML_HTMLorMML"></script>
|
替换为
1
|
<script src="https://cdnjs.cloudflare.com/ajax/libs/mathjax/2.7.5/MathJax.js?config=TeX-MML-AM_CHTML"></script>
|
即修改了渲染js的地址, 地址来源于官网: https://docs.mathjax.org/en/latest/start.html
参考: https://github.com/hexojs/hexo/issues/3279
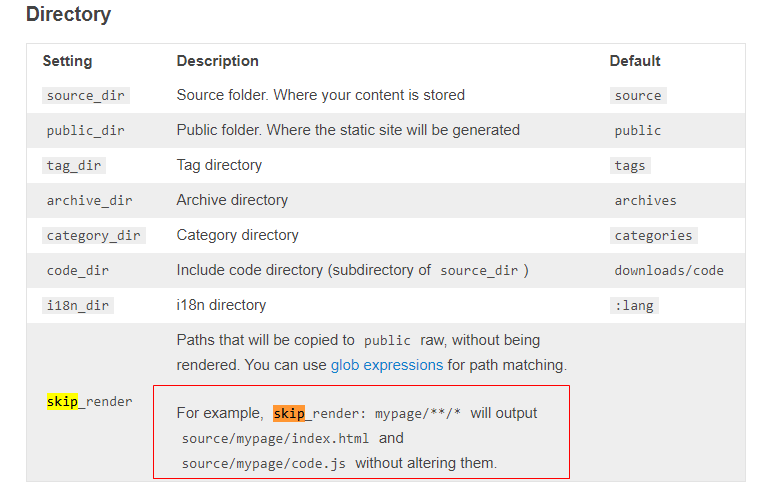
! 尝试了修改hexo下的配置和主题下的配置添加下面内容都无效
1
2
|
mathjax:
  cdn: //cdnjs.cloudflare.com/ajax/libs/mathjax/2.7.5/MathJax.js?config=TeX-MML-AM_CHTML
|
添加新页面
https://github.com/hexojs/hexo/issues/1453
hexo template
添加目录
article.ejs中添加
1
2
3
4
5
6
7
8
|
  <!-- TOC -->
  <% var mtoc = toc(post.content, {list_number: false}); %>
  <% if (mtoc) { %>
    <div class="toc">
      <h3>Content</h3>
      <%- mtoc %>
    </div>
  <% } %>
|
custom.css中添加
1
2
3
4
|
.toc {
  background-color: #eee;
  padding-left: 25px;
}
|
参考:
windows图床工具
七牛云不支持测试域名了, 需要自己的域名, 后面就没测试了
awesome themes:
添加 readme
注意, 上面很多方法都是不可行的
包含
正确的解决方法

即README.md文件必须要在source目录下!!!
永久链接
https://clearsky.me/hexo-permalinks.html
参考链接
https://juejin.im/entry/5a8079a85188257a6e402c17
站内搜索
https://hackfun.org/2017/10/04/%E7%BB%99hexo%E6%B7%BB%E5%8A%A0%E6%9C%AC%E5%9C%B0%E6%90%9C%E7%B4%A2%E7%AB%99%E5%86%85%E5%8A%9F%E8%83%BD/
图片及code linenumber
 1
 2
 3
 4
 5
 6
 7
 8
 9
10
11
12
|
https://gitee.com/wfcrgt/hexo-blog/blob/master/themes/bootstrap/layout/_partial/archive.ejs
<div class="post-img-preview">
        <div class="post-img-preview-content">
           <%- truncate(strip_html(post.content.replace(/<br\>|([<span\>]\d+[</span\>])|<\/.*?>/gi, " ")), {length: 150, omission: '...'}) %>
        </div>
        <% var img_matched = post.content.match(/<img [^>]*src=['"]([^'"]+)[^>]*>/gi) %>
        <% if (img_matched) { %>
          <div class='post-img-preview-img'>
            <img src="<%- "/p/" + img_matched[0].split("\"")[1] %>" height=100% width=100% >
          </div>
        <% } %>
      </div>
|
[TOC]

